Getting Started
PDL 7100 is an automotive diagnostic scan tool with sophisticated functionality, advanced graphing features, an intuitive user interface and user-customizable configuration.

There are four “push type” control buttons and one “thumb pad rocker type” multi-directional button located on the right side of the diagnostic tool. All other diagnostic tool operations are controlled through the touch screen.
Touch screen controls are used for most operations, however the control buttons may also be used to navigate and select functions.
|
Item |
Button |
Description |
|
|---|---|---|---|
|
1 |
– |
Power Supply Jack |
|
|
2 |
– |
Battery Status Indicator LED |
|
|
3 |
– |
Mini USB Jack |
|
|
4 |
– |
Micro secure digital (uSD) Card
|
|
|
5 |
– |
Data Cable Connector |
|
|
6 |
|
N/Cancel |
|
|
|
Y/Accept |
||
|
|
Directional Buttons |
||
|
|
Shortcut
|
||
|
|
Power (On/Off) |
||
|
7 |
– |
Fold out Stand |
|
|
8 |
– |
Battery Cover |
|
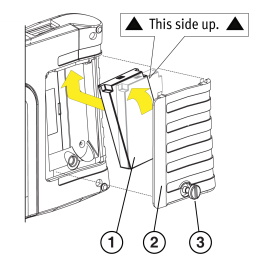
| 1. | Remove the battery cover and install the supplied battery pack with the arrows facing up, then reinstall the cover. |
Do not overtighten the battery cover screw!
| 1. | Battery Pack |
| 2. | Battery Cover |
| 3. | Battery Cover Screw |
| 2. | Press and release the Power button  to power on the tool. to power on the tool. |
Connecting the data cable to the vehicle’s DLC, also powers the tool.
Scanner makes vehicle communication easy, by providing full scanning functionality including these features and more!
| ● | Code Scan - Scan multiple systems in a single touch |
| ● | Data Graphing - View multiple graphs at once for data comparison analysis |
| ● | Functional Tests - Perform functional component tests, and adaptive relearns |
Scanner Basics
| 1. | Select Scanner from the Home screen, then select Automotive. |
| 2. | Select the Vehicle make and follow the prompts to identify the vehicle. |
| 3. | Select a System (e.g. Code Scan, Engine, Transmission, Body, etc.). |
| 4. | Follow the onscreen instructions to connect the DA-4 Data Cable to the vehicle OBD-II diagnostic connector. |
| 5. | Connect the DA-4 Data Cable to the diagnostic tool. |
| 6. | Follow the prompts to select a System (e.g. Engine, ABS, Transmission). |
| 7. | Select a Function/Test (e.g. Codes Menu, Code Scan, Data Display, Functional Tests). |
The OBD-II Data Cable is equipped with an LED to let you know if the vehicle is supplying power to the diagnostic tool. In addition, the integrated LED flashlight can help you find and connect to the vehicle’s data link connector (DLC).
Scanner - Additional Information
Scanner Demonstration
The built-in demonstration program allows you to explore Scanner functions without actually connecting to a vehicle. Get up-to-speed by navigating through Scanner operations, including vehicle identification, system selection, Code Scan, PID graphs, and more!
| 1. | Select Scanner , from the Home screen. |
| 2. | Select Demonstration, from the vehicle make menu. |
| 3. | Select 2009 > Manual ID > 407 > 1.6L T-Diesel (9HZ). |
| 4. | Select OK, to confirm the vehicle, then select Continue. |
| 5. | Select Engine Management > Continue > Codes, to display the codes results list. |
Quickly access global OBD-II/EOBD codes, tests, and data without having to identify the vehicle
| ● | EOBD - access OBD-II/EOBD service modes (e.g. $01 to $0A), allowing you to view current diagnostic trouble codes, parameter data, freeze frame information, O2 sensor monitoring test results, check calibration numbers, and more! |
| ● | OBD-II Health Check - quickly check or clear diagnostic trouble codes, check readiness monitor status, and MIL status. |
Wi-Fi Required
Technical Service Bulletins (TSB’s) keep you informed of manufacturer recommended servicing and maintenance work.
The bulletins contain checklists of items requiring inspection or repair. TSB’s are available for Engine, Steering, Brakes, Exterior (Bodywork) and Electronics, and can be viewed by system or as a full list.
Save setup time when re-testing a vehicle, and review your saved files.
| ● | Vehicle History - lists the last twenty-five vehicles selected. |
| ● | View Saved Data - lists all saved data files, including screen images. |
| ● | Delete Saved Data - permanently erases saved files from memory. |
Easily change settings to your preferences, and transfer saved data files to your PC.
| ● | Connect-to-PC - transfer saved data files to your PC using a USB cable and ShopStream Connect™. |
| ● | Get Connected - find authorization codes to create your Snap-on Cloud account on ALTUSDRIVE.com. |
| ● | Configure Shortcut Button - change Shortcut button function. |
| ● | Settings - adjust display and unit measurement settings. |
| ● | System Information - find software, and system information. |
Watch short videos on how to setup and get started using select features of your diagnostic tool.
| ● | Setting Up Wi-Fi |
| ● | Setting Up The Snap-on Cloud |
| ● | Sharing Code Scan Reports |
| ● | Upgrading Your Software |
Wi-Fi Required
Automatically transfer Code Scan results to the Snap-on Cloud, then use your mobile device to access, print and share a Vehicle System Report.
| 1. | From the diagnostic tool Home screen, select Tools > Settings > Configure Wi-Fi. |
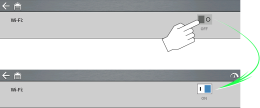
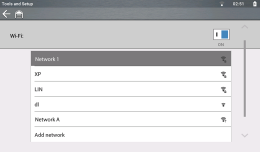
| 2. | Turn Wi-Fi on and select a network. |
| 3. | When connected, a screen displays that includes the device Serial Number, PIN and Code needed to register. Record these numbers. |
| 4. | Using a mobile device or PC, visit https://ALTUSDRIVE.com and select Create Individual Account from the Login screen. |
| 5. | Enter the required information and create a Username and Password, then select Create. |
| 6. | At the “Success” confirmation screen, select Done. |
| 7. | Log in using your Username and Password. |
| 8. | Answer the security questions, then select Submit. |
| 9. | From Technician Profile Manager select the Device Management tab. |
| 10. | Select Add Device, enter your Serial Number, PIN, Code, and Device Name. |
| 11. | Log out of the application. |
| 12. | To get started, log in using your Username and Password at https://ALTUSDRIVE.com. |
For more information, see Snap-on Technician Profile and Snap-on Cloud
Use Security Link to access secured gateways on select vehicles. For more information, see Security Link
ShopStream Connect (SSC) is a companion PC application available at no cost that gives you the ability to connect your diagnostic tool to your PC.
| 1. | Get started by downloading and installing the SSC application onto your PC. |
Download SSC from: https://eu.sun-workshopsolutions.com/en/products/shopstream_connect
| 2. | Connect the USB cable to the diagnostic tool, and your PC. |
| 3. | From the diagnostic tool, select Tools > Connect-to-PC. |
| 4. | Use the SSC application to: |
| ● | Print data files and Code Scan reports |
| ● | Download Software Updates and Upgrades |
| ● | Transfer data files bi-directionally between the tool and your PC |
| ● | Save and Manage data files |
| ● | Add Notes to your data files |
For more information, see ShopStream Connect (SSC)
For your safety and the safety of others, before you operate this device read and understand the Important Safety Information.


